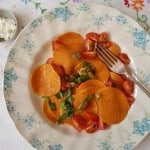
Tomato corzetti pasta … From master craftsman to pastaia!
I was never much of an artist at school and in all honesty my drawing is still as basic as an excitable 4 year old child. However when it comes to making pasta and all things encompassing my business I seem to have found a sense of colourful creativity. I often find myself lost in the moment from the flavour and colour of each pasta design, to the shape, sauce and finished plate. However I am unable to create such beautiful pasta without the vast array of tools I use and have collected over the years. When I say tools I refer to various brass pasta cutters and rollers, a selection of wicker baskets to roll and dry pasta within, a range of shaped raviolamps (ravioli presses) , pasta extruders, rolling pins held at various lengths and a range of carved wooden boards. My selection of tools are most certainly becoming an obsession while making the very best possible collection of course.Around 4 years ago I met a wonderful Italian Craftsman called Filippo Romagnoli (FlorentineTouch on Etsy) who is based in Tuscany with his family. He makes the most exquisite rolling pins and wooden carved pasta stamps. The pasta stamps are called ‘Corzetti’ stamps and are made and crafted solely from wood. This particular shape is a circle similar to a disk or large coin. The coin or corzetti is imprinted with the carved design (by hand) on both sides. The dough is normally a standard pasta dough that isn’t coloured and is made with a little wine or vermouth. For my recipe however I have chosen to use tomato puree to compliment the raw tomato dressing. My standard dough and recipes can be found in my second book ‘A Passion for Pasta‘. Filippo has made me all of my 6 corzetti stamps for my pasta work with the most recent commission being a little different I’m sure to what he’s normally used to. I wanted the stamp when pressed to look like a freshly sliced tomato. I wanted to see the detail of the seeds and internal structure on each pasta disk when pressed. Filippo was left to tinker and as I expected the corzetti stamp I received was even better than what I had initially envisaged. Carving the wood delicately by hand Filippo could obtained the most incredible detail, this making my most basic pasta dough into a show stopping piece of art. I suppose it’s similar to using the best mixer or using your favourite dinner service, in order to create you will always need a little help.So here is my simple plate that was made by me but with the help of a true artist. Please enjoy my tomato corzetti pasta with raw cherry tomato dressing and quenelled honey ricotta.
Servings 4 People
Ingredients
PASTA
- 400 gm 00 Flour
- 150 gm Tomato Puree
- 2 Large Eggs
DRESSING
- 5 tsp Olive Oil (Filippo Berio) extra virgin
- 1 Garlic Clove peeled, crushed
- 300 gm Ripe Cherry Tomatoes quartered
- 100 gm Salted Capers rinsed, dried, chopped
- 150 gm Olives de-seeded, chopped
- 1 Small Lemon zest
- Bunch Basil roughly chopped
- Salt and pepper to season and to taste
- 200 gm Ricotta whipped
- 2 tsp Honey
Instructions
- Into a small bowl mix the tomato puree and eggs together until smooth.
- Using a food processor for ease add the flour and tomato puree mixture. Mix and combine. Tumble out and knead the dough on a lightly floured wooden surface until smooth and elastic. Cover fully and allow the dough to rest at room temperature for 30 minutes.
- Stir well and leave the bowl on the kitchen side at room temperature for at least 20 minutes.
- Cut the dough in half to make the rolling a little easier. Cover one half or dough until needed. Roll the pasta out with either a rolling pin, wooden broom handle or a pasta machine to the thickness of a lasagne sheet. Use either an embossed cookie cutter or corzetti stamp to imprint your design. Use all of the dough and once made allow the freshly made corzetti to dry for 20 minutes before cooking.
- Place a large saucepan of water onto boil. Once boiling salt well.
- Cook the pasta until aldente, this may take 4 minutes or so.
- Drain the corzetti and reserve around 100ml of the starchy pasta water.
- Incorporate the pasta with the prepared ingredients and add a little of the pasta water to emulsify.

Leave A Comment